One of my superpowers, (maybe my only one) is the ability to find and know how to use obscure commands. I have an advantage in that I am constantly helping engineers on various projects. They may want to streamline a process or be stumped on how to get through an issue. Having a variety of projects to work on keeps me in front of new commands as well as old favorites.
You never really get to know all the commands in a program, few of us DO everything a software program is capable of. An issue presents itself when you’re required to step outside your daily routine. This can involve a process you barely learned about in training, requiring you to do something difficult, just to forget it until you need to perform the process again.
How do you find a command you never use and do just enough to get the process done and back to work? I will go through how I locate and proficiently use those seldom used commands.
For this offering, I will be looking through Carlson Software on AutoCAD Civil 3D. The program is mature and there are a lot of commands that are deep in menus or even only accessible by command line. Trimble Business Center, being a bit newer, isn’t as complex. The fact that it is module based will limit your access to commands outside your normal routine. The challenge comes when you take on new responsibilities, add modules and start hopping back and forth.
JUMP TO SECTION
Identify Commands
How many times have you encountered an issue that could be solved with a command you used two years ago? You forget the name and don’t really want to go through the entire command list to find it. I suggest this approach. When you need to find a command, take a step back and put yourself in learning mode. If you try and grab and go with a command, you may not get it right and the next time you need it, the process begins again.
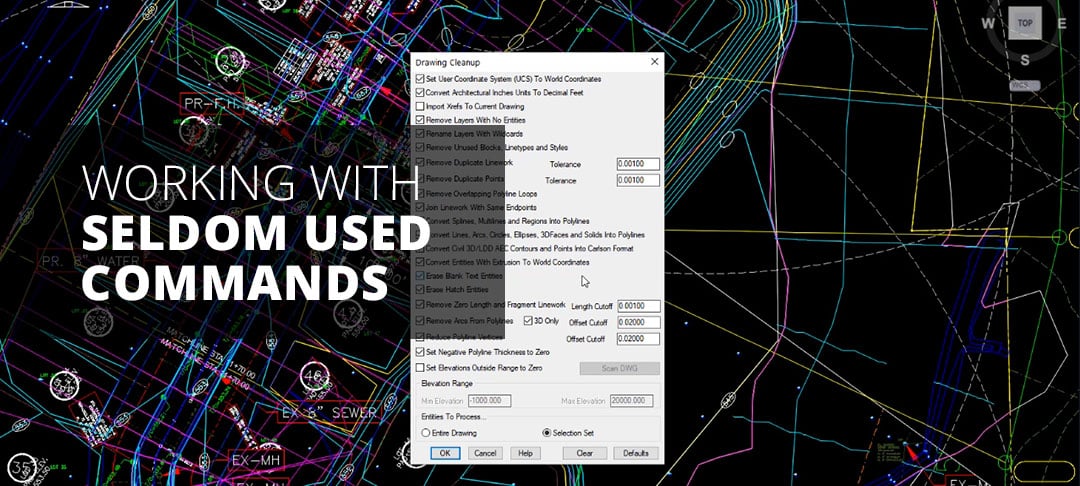
To make sure this never happens, do some work to make things easier the next time. There is a way in Carlson to make points at the intersections of lines. I will dig until I find it but to save time, I will make a “command sheet.” I’ve listed the items I put on the sheet below. They can all go into a Word document so you can search command words to make things easier. As I go through the process for getting familiar with a command, you can choose the elements you want to put into your version of a command sheet.
Command Name
Name the software uses for the command.
Add keywords to describe what it does and how to apply it.
Prior and possible uses for the command.
Tip: When you are in learning mode, watch how others are using the command.
Command Location
Both menu and command line descriptions.
A walk through of how the command works. Add screen shots as well as dialog to make it clear. Remember, you will not look at this for months, in addition, it will be shared with others in the office, and it needs to be self-explanatory. I sure do not want to field a call about a command I do not know well.
For this example, I will drill down into a Carlson command.
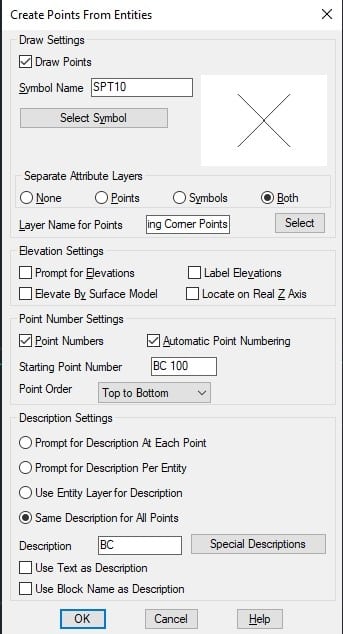
Command Name: Create Points from Entities
Keywords: Points, create points, points from lines, intersections, radius points, extra points
With these basics I can go back and search my document to locate the command for future use. At this point, I want to work with the command to get familiar with it so I can do some documentation.
Dialog Box Notes
Verify symbol and layer for draw points.
Always separate attribute layers to keep screen cleaner.
Check points elevated by the surface.
Always locate on Z axis.
Do automatic point numbering, try, and use alpha-numeric for clarification in the model.
Point order can be left to right or start at the top or bottom.
Description settings if needed.
With these parameters listed and noted, you will save time the next time you use the command and get things looking the way you want. Here is the dialog box with the desired information and appropriate settings. These are 2D points so they will not be located in 3D. Once the dialog box is populated the way you want, you can move to the next.
The dialog box can get you into trouble. Any time you are using a command, be sure to save the project first before shutting down the program. The reason is it can cause issues like you may get points where you do not need them as well as way too many points. The points in Carlson go to a coordinate file and would need to be removed even if you close or undo the command. Proceed with care.
Consider accessing the help files as they can actually have useful information. Here is part of the Help instructions for this command.
This command will create Carlson points on selected entities. The points are stored in the current coordinate (.CRD) file and drawn on the screen. For arcs and polylines with arc segments, points are created at the radius points of the arcs as well as the PC and PT.
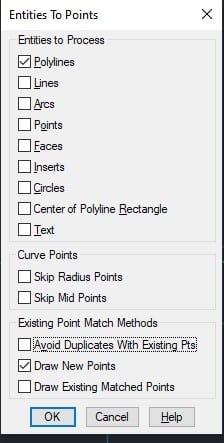
In the first options dialog, there are settings for the point attributes. To have points obtain their elevation from the selected entities, unselect the Prompt for Elevations toggle and select the Locate on Real Z Axis toggle. After you have specified the point options, a secondary dialog appears which allows you to specify the entity types to process. The Point Order setting controls the sequence of the new point numbers to be in the order of selection or in a direction like left to right. Under the Description Settings, Prompt for Description At Each Point will prompt you at the command line for a description for each individual point. Prompt Per Entity will ask you for a description per each highlighted entity. Use Entity Layer for Description will assign the layer name to the description. When Entity Layer for Description is checked, the layer name of the entity will be used as the description for the created point. Same Description For All Points will prompt you for a single description for all points. The Use Text as Description applies to points from Text entities where the description is set to the text string. The Use Block Name as Description applies to points from Insert entities and the program sets the point description to the block name.
The second options dialog has processing settings. When Avoid Duplicates with Existing Pts is checked, this routine will not create a point if a point with the same coordinates already exists in the current coordinate (.CRD) file. The Draw New Points option creates point entities in the drawing. Otherwise, the new points are only stored to the coordinate file. The Draw Existing Matched Points option applies to the Avoid Duplicates option for the case when a duplicate is found in the coordinate file and not yet drawn.
That is a lot of information that will come in handy. I will also usually copy and paste the help dialog into my command sheet if nothing else to have more searchable words. I also save the file as a pdf and use Bluebeam to search; it does a great job and notes where the text is as well as words around it for context.
Other Considerations for Seldom Used Commands
This is to be shared with others in your group. I suggest creating a document intended to be shared by everyone.
Do not use this as a substitute for training. This is more of an advanced search tool with written reminders of a command you learned how to use some time ago. I see too many mistakes when a command is executed, and problems arise when something goes wrong, and the operator does not understand.
Many of these commands can be used for another purpose than intended. This Create Points From Entities command can be used to create layout points for staking curbs and buildings. Most people use it to densify a model or elevate point cloud data with local feature lines now correctly elevated.
The keyword section can contain random entries that can bring the command back to memory. For example, I have an entry “command C Lawson showed me at dinner.” When the file gets over 100 commands, you sometimes need to stretch the box.
Stumped on a project? Need extra hands to stay on schedule? We can help! Contact us and find out about how our expert engineers can assist you on your next takeoff or modeling project today!