
When spring rolls around, road construction gets into full swing. Road contractors have been early adopters of technology and continue to drive the development of new applications and equipment. Among them are laser augmentation for vertical accuracy and the automation of paving and curb machines. To improve efficiency, contractors should use technology wherever possible. This includes preparation of dirt grades and the application of subgrade materials.
JUMP TO SECTION
Optimizing Standard Road Subgrade Construction Techniques

This drawing shows three (3) layers that can be installed using at vertical offset. With a well prepared subgrade, it is possible to pave using sonics and obtain good results in a basic parking lot.
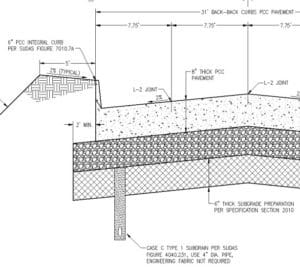
The subgrade extends beyond the road/curb finish. To make this easier to model, just the finished surface can be built. The equipment operator can run the blade down the road section and use sonic and cross slope, or a horizontal machine offset to pick up the additional two feet.
Techniques for Achieving Extended Road Subgrades
Office Calculated Subgrades Software programs can build the subgrade for roads with extended hinge points. It requires the data builder to build “another road”, adding time and complexity to the project. The result of this work is a new surface that represents the top of dirt grade where the subgrade and side slopes can be graded as one surface.
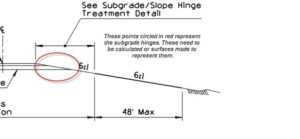
Often there is not enough time, or the data builder may not have learned the process. The field crews can establish the hinge point by the following method.
Build the road to finish grade. Establish the side slopes and begin grading them. At the same time, machines working the driving lanes can check the progress of the dirt grade. The machines on the driving lanes can dial down to the top of dirt, as long as they do not break over to the side slopes. Using horizontal offsets, the driving lane machines can work with those on the side slopes. The hinge point will result from their work. My YouTube video will clarify this.
Navigating the Complexities of Multi-Layer Road Subgrades
A complex road subgrade benefits from machine control. It also requires the production of at least one additional surface for the subgrade. The additional work is rewarded with a better product produced in a shorter amount of time.
Precision in Locating Compacted Hinge Points for Road Subgrades
When building a road subgrade model, we know the finished location of the hinge point in 3-dimensions. If you don’t make all subgrades in the model the hinge point, the surface you are working on may not be called out. I will cover a work around in detail.
When this information gets into the field, the dirt either needs to be laid flat to compact to grade or compacted high to trim. With expensive subgrade materials and expensive geo-textile mats, there is no room for error. Here are some methods we employ to make this work.
Essential Practices for Trimming Road Subgrades to Perfection
When you get compaction on select fill in a subgrade planned for trimming, the trim amount is often not specified. We have seen times where you need to overbuild to 5-hundreths and trim, but this is the exception. Here is what we do:
- Run tests with real world natural conditions, meaning the OG may compact more in some areas. Test compaction amounts of the select fill and adjust if the material spec changes. A close relationship with the supplier will help here. The biggest change we see is moisture. Some fills will respond to high moisture content poorly. Once everybody is happy with the testing, closely monitor the first few instances to confirm. Stringless trimming is the way to go here.
- The road model is also what was used to produce the subgrade model. Trimming fill is cheaper than grinding concrete, so this is your first check of the roadway model. Any adjustments made in the field need to go back to the model builder so that the finished paving can reflect updates. We see this mostly around bridges, drainages, and tie ins.
- A trimmer needs the same setup quality a paver does. I have seen trimming crews run a bit fast and loose with subgrades as the stakes are not as high. Watch closely.
Strategies for Managing Multiple Road Subgrade Layers
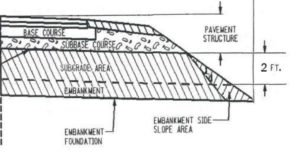
Here we see a paving section where multiple materials intersect and even stop short of the side slope. The called out “Embankment Side Slope Area” is drawn differently than it will be graded. Most will run the subgrade and embankment to the side slope.
In building this model, there are multiple hinge points. The best way to address this is to get the side slope close to right and run the subgrades out to the hinge. There are some precautions that you need to be aware of:
- The BIGGEST issue that needs to be addressed are correct slopes and daylight lines. Be sure you have a tight ground model to model. Only then can you rough cut the side slopes to get the hinges right with less material use.
- Compaction of embankment will be a moving target. Watch compaction of different soil types.
- Don’t think you’re wasting your time building different subgrades. They make sense for a lot of jobs.
- When automating paving, we will build a track grade model that sometimes changes the hinge point during construction. A final model is used to get the slopes back in line after.