JUMP TO SECTION
Surfaces
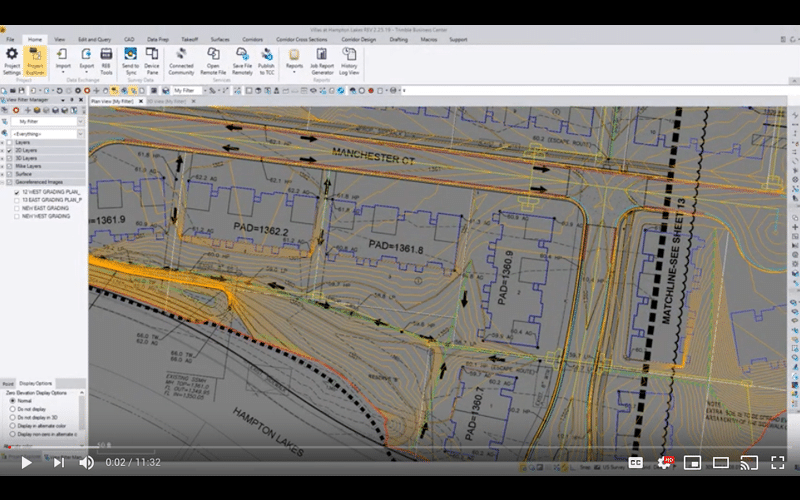
Often there are several stages of dirt work within a subdivision. Don’t be afraid to create several surfaces for a site. Similarly, the details of the finished pad elevations, and even lot sizes, are not detailed due to the rush to get something out of the ground.
Starting with an erosion protection plan will establish several retention areas to contain site runoff during construction. These are usually basic and don’t require a lot of detail. Be sure to include any silt fencing and erosion barriers that are required in the initial work.
Streets
You can count on a lot of streets in a residential area. We have performed grading and paving data using many unique details that will help field crews. Here are a few of the models that we make:
Rough Grade Section
A great planning tool for dirt efficiency is a “gut section” model for streets. The idea is to do an over excavation of the streets so the spoils generated for utilities can stay there, and be used to get the road to subgrade in preparation for stone.

The above example shows the street to subgrade, cut straight across, ignoring the crown. We also went to 2-feet behind the curb so the curb machine can get better access. A model is built to street slopes as well so the subgrade and stone are set right.
Curbs
One of the best things to do when establishing curb grades is to give the field extended information for more efficient outcomes. We have been building curb data that helps the field for years. Here are several of the ideas that make things easier for them.
Working with Curbs
Top back of curb (TBC) grades are the base for everything that happens for streets. The sidewalk is set from that elevation to the inside. The grade is used to set string line, or made into an alignment for a guided machine. When done correctly, the street base can be graded with a laser against the top of curb and paved, even with the gutter. The issue with a curb elevation line is it is exactly that, a razor thin line that changes quickly in elevation to the inside and 1.5-2% to the outside. Often times this gives us a slightly incorrect curb elevation that seemed correct but makes for an inconsistent road.
One of the best ways to provide solid TC elevations is to do an offset line, usually about 3-feet behind the back of curb, and make a surface reflecting that.

Here is a cross section showing the finished grade sidewalk section on the right and the flat TBC offset added to the right. A couple notes:
- The name “Curb OS” appears on the screen because I named the linestring. That’s the reason I use naming for linestrings to verify their inclusion.
- The sidewalk on the left has a 1.5% slope. The maximum slope for a sidewalk is 2%. We bring that down the half a percent to insure the slope never goes over the max.
The cross section of a curb relates to how things get worked out in a slip formed curb and nothing to do with grading. We will look at what the curb does as it’s placed and what we do with the subgrade.
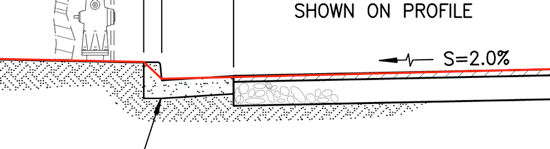
When we grade a road, the above (in red) is how the surface is made. The cross slope of the road is 2%, and the slope of the gutter in this typical is 6.5%. If we were to respect the gutter slope, the grader would get confused and make a mess of things, as the tip of the blade got close to the grade break.
Keeping the slope at 2% gives a bit of stone for the curb machine to plane as it makes the pouring pass. The difficulty comes in understanding what happens when you dial down to get to subgrade.
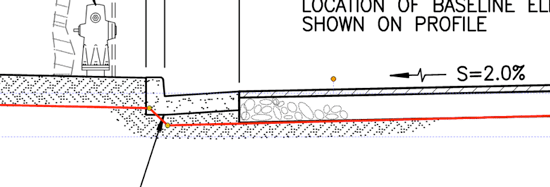
In the above diagram I am dialed down to top of native. The subgrade needs to extend out for several reasons:
- The original ground for the curb is not excavated.
- There needs to be an offset to provide room for the curb machine.
To make this part of the job easier, be sure the TBC line is continuous so snapping and offsetting for grading is more efficient. When placing stone, be careful to get just enough under the curb to give the curb machine something to grab to but not so much as to waste a lot of material.
When you have made a surface that has the flat TBC area, be sure to include the finished grade surface so the sidewalks and parkway sections are correct.
Lots & Pads
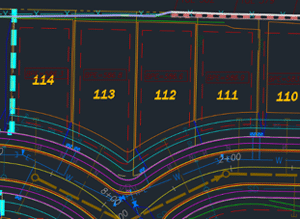
Lot Marking
I have always wanted as much information as possible on a data collector to do my job. When it comes to marking out lots for grading sometimes you can get too much on the screen.
At the very least, you need to have the lot number and pad elevation. Here are some additions that may help in some jobs but can cause clutter if used at the same time:
- Lot Dimensions are seldom necessary. Where we find them useful is for acre sized lots that are irregular and insure you are not grading somebody else’s property.
- House layout lines can help to define driveways and lot grading details. They take a lot of memory due to the number of lines and detail. Clients may load and bring this on the screen late in the job.
Pad Overbuilds
When you need to add block walls, or larger fences, to stepped pads an overbuild is usually required. This changes several things:
- The lot line is now not the top or toe of the slope. It is necessary to maintain lot lines on your screen for clarity.
- Some details call out overbuilds for a block wall then removing material later after it’s in. Watch the grading details closely.
The overbuild goes into the high lot 2-feet, after the wall goes in the bench and slopes are modeled to get drainage right.
Raking Pads
When a series of lots are vertically separated, usually by .3 feet or less, the grading plan calls for the pads to be sloped from the high pad to low. This is not a problem and makes the work go faster. Lot lines and pad compaction can suffer so be sure to detail these areas with good linework.
Basements
Lookout and walkout basements are an opportunity to use a lot more detail than flat pad sites. We have done everything from excavation pits and laybacks for walls to finished slopes outside the footprint to provide positive drainage between lots.
Each home site is an individual grading plan that has to be reviewed and data prepared properly. When the plan is designed well on the screen, guided excavators can make the basements quickly.
Summary
I have explained some drill down points that will help to improve accuracy in building subdivisions. The accompanying video goes over the information provided plus other details we use to improve the quality of this type of job. Included are some alternate approaches to lot and street design. Staying with design and translating that into practical models that increases efficiency is an ongoing task we take seriously.