We all want all jobsite data available to us in a grading model. I have always contested that 10 minutes at the computer is about 30 minutes in the field balled up in the truck with a calculator. We do as much as is requested for a job, but we will also not waste your money when it’s not cost effective or better to be done in the field. In this offering, we look at both scenarios to show what a good model and related details can look like.
JUMP TO SECTION
Demolition
It’s good to have detailed information on the areas of a project that are slated for removal. However, we need to be careful because the quality of the information can cause more problems than cures. The first step is to get the CAD files from the existing conditions and send them to the field for comparison. If the 2D linework is an exact match, it would then be okay to let the work get to the field for demolition. Keep in mind, this only works for what is visible. I try not to trust the sub-surface drawing data and usually exclude it. We have seen too many pipes that do not follow a straight line and are broken when digging.
What to trust? Always be careful when supplying existing conditions to the field
Now that we have a solid trust in the plans for demolition, what is the procedure and deliverables?
- 2D linework initially goes to the field for verification.
- Take point shots to confirm plan views.
- 3D points will help to update the demolition plans.
- Be aware of amounts and locations for demolition. If something is missed, now is the time to document and get a change order started.
- Incorporate the 3D shots into your demolition file.
- Update the existing utility locations as you go along. They will be part of the as-builts.
Model Basics
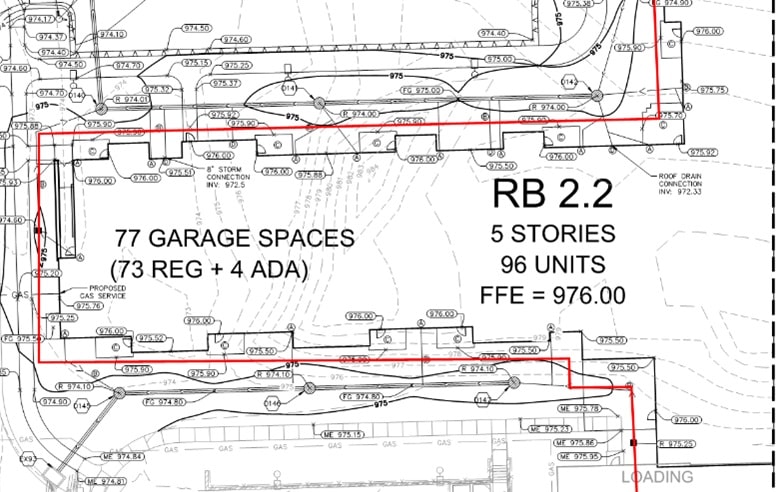
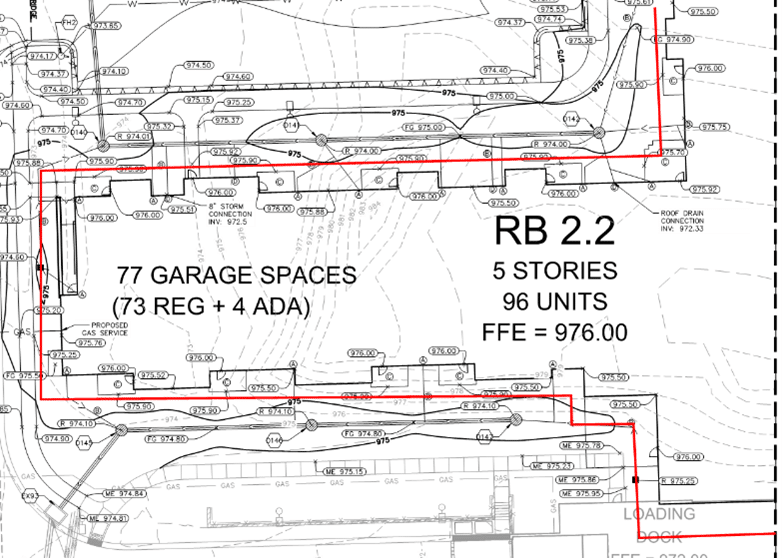
There will be some confusion as to what constitutes a model and what is extra and may not be needed. For sites, I have seen just building pads and retention areas. The model builder for the contractor thought it was best to work out the parking lot in the field. When we are asked to do “the usual stuff” for a civil site, here is what you will get:
- All pads to requested grade. Some people like finish slab height while others want top of stone base.
- Retentions to requested grade. There will sometimes be liners, clay or topsoil added later so we might do a retention subgrade.
- Parking lot to finished grade. We use finished grade in the model for two reasons; it’s easy to dial down to subgrade and when you need to reference plans for grades you avoid possible math errors to guess subgrade. It is also easier to offset the parking lot slope to grade 2-feet behind back of curb for a machine to pour.
- Curb layout can be lines and/or points at top back of curb as well as offsets. More on that later.
- Offsites are a wildcard. If we get grades for deceleration lanes and approaches, we will enter them. Usually, we will want some existing grade shots to confirm. This is important when there is a sawcut and we need to make a lane, gutter, and curb to flow correctly.
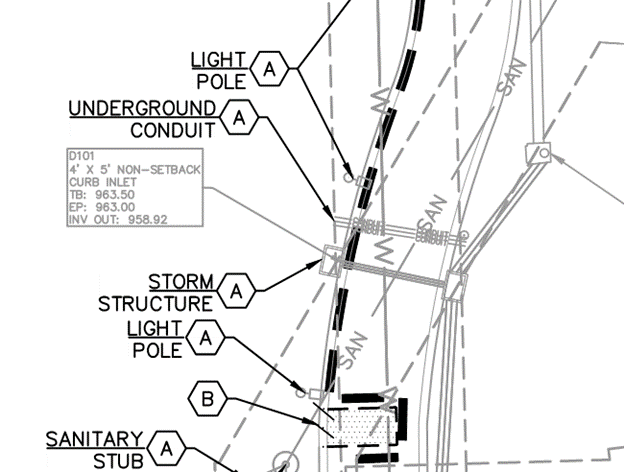
- Utilities are an option. We provide surface inlets, grates, and manholes but pipe and structures can be added for contractors who self-perform.
With this information the contractor can get a job to the point of completion while working with a surveyor. All information should be available to the engineers, surveyors, and forward-thinking municipalities. We often send out different file types for various programs used by those other than our client.
I usually find that when contractors get comfortable with this technology, they start thinking beyond the basic model. I have always tried to leverage the power we now have. With that, we are always able to improve the use of GPS surveying and related equipment to make things quicker and reduce re-work. The options that follow are a welcome sight to an experienced user. New users will feel like they are drinking from the fire hose. Be cautious when getting new users up to speed. A more basic surface model and less linework can make the process easier.
More Information
I need to caution the reader here. With additional information comes added responsibility. When you leave the basic model and start adding on, this results in extra layers, more surfaces, and various points files. All this needs to be managed and kept current. Before stepping off and getting into these weeds, make sure you have file flow dialed in.
- Every surface and linework file must have a date. It makes it easier to identify the most current information is being used.
- Use a cloud-based service for field files. Set it to notify involved parties that new files are available. This makes it easy to know when new files arrive. Without this setting, remote workers waste time checking the folders or could potentially use outdated information.
- Have one person in the office be responsible for updating. They will also keep the field in touch with changes and next steps.
Additional Surfaces
When doing added work, it’s sometimes easier to just make a new surface. Here are some examples:
- A large excavation for a basement or underground parking. We will often build ramps and haul roads for mass excavation. This allows the haul roads to be cleaned on a regular basis for high-speed scrapers. Smooth ramps and roads save beat up machines.

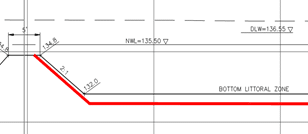
- Retentions with specific subgrades usually need another surface. The reason is that the final size is critical and often these have steps in the subgrade but need to be smooth for finish.
- The job here had a deeper subgrade in the botton than the sides. It would have been difficult to just make a finished grade model or only a subgrade. Always look at the time it takes to do a quick in-progress model as opposed to having to work things out in the field.
Curb Offsets
Whenever we are asked to do curb offsets, there needs to be a clear idea what we are after for production. Here are the options we usually perform.

- Top Back of Curb (TBC) Surface. We will make an additional surface that represents the TBC elevation and a specified offset. This allows the field to walk (usually 3-feett) wide surface that is the TBC elevation for layout and checking. Always make this a separate surface, otherwise it will make a mess of the grading model if you don’t.
- Layout points. We provide 3D so we can layout the curve PC, PT, and radius points. Also provided are points along the straight lines for grade checking and string setup.
There are a lot more things that can be done with a little imagination. Look for more ideas in the upcoming blog articles. We do a lot of specialty work that may help you someday.