The US Survey Foot is Retiring, The International Foot is The New Survey Standard

The US Survey Foot is Retiring, The International Foot is The New Survey Standard

A change came about at the beginning of the 2023 year that can have an impact on you and the survey work you do in the office and the field. The new rule:

The United States will retire the use of the US Survey Foot and unilaterally adopt the International Foot as the standard of survey measurement.

Until now, only 5 states have used the International Foot. The US Foot is a ratio and is not an exact conversion like the International. From a geodetic standpoint, this new standard will improve accuracy. The International Foot is 2 feet per million feet longer than the US Foot. This will allow you to look at the coordinates of your location instead of focusing on the size of your job.

Learn how the International Foot can affect your survey work and how to easily adopt the new standard in the field and at the office with best practices.

See the International Foot in Action

When using state plane coordinates, we are often 2-4 million feet in the coordinates of our work. If the job is produced on one unit type, then changed to the other, the job has now shifted 2 feet per million feet in both the north and east grid directions with non-affected elevations.

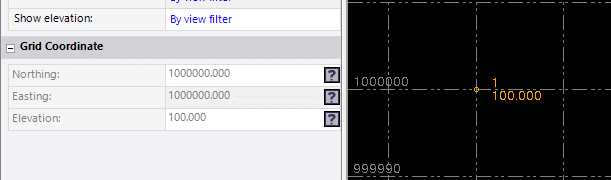
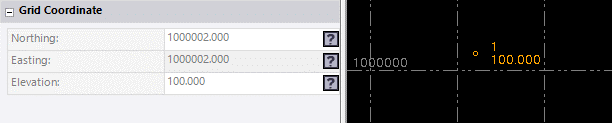
To illustrate further, here is a job started with a US Survey Feet point drawn at N1,000,000 E1,000,000.

Grid screenshot of US Feet Measurement

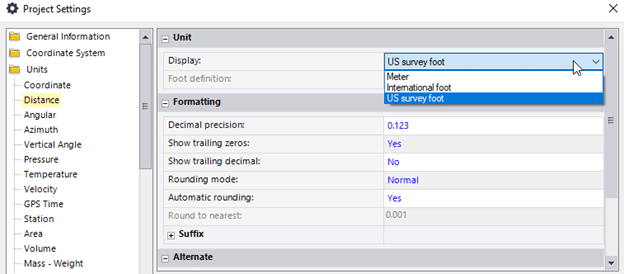
Now, let’s update the point drawn in US Survey feet by changing the units:

screenshot of unit changes

If the survey standard unit changes to the International Foot, you can see the 2-foot shift in the entire job with updated coordinate points.

Grid screenshot of International Feet Measurement

In the past when the US failed to adopt the metric system, plans were drawn in a metric that was worked on for ten years after an idea was abandoned. Similar outcomes are expected to happen with this new transition as well. Realizing the big impact that changing units can have on your jobsite, it is important to have best practices put into place so that you are set up for success and rework can be prevented.

Best Practices Moving Forward

Units should be listed within the first few pages of the job plans, so the next steps are identified. Over the next few years, while jobsites are being acclimated, here are some action items to keep your work updated and ready to transition.

  • It is imperative that all parties use the same units. The job does not necessarily need to shift right away. If ALL parties are staying with US Feet, you can localize and continue.
  • Do not rely on Google Earth to verify your current unit’s accuracy. It’s not a very reliable resource.
  • Have control points on the job as you are building the model. It is the definitive test as to the correct units. Based on the previous example, if the control point was 1,000,000/1,000,000 you would know you were measuring in US Feet. As long as everybody stays there, you can proceed.

Problems can arise when somebody changes units either in the office or the field. So, taking the correct steps to manage the file and jobsite correctly between both places is imperative. Here are two  checklists for teams in both places to reference:

In the Office

    • Verify units by having control points before sending the job to the field.
    • If you make the job in one unit type and switch to the other, make sure you export all the job files after you have shifted the job.
    • Add a suffix to the job file. Now it has job name-date-units. An Example would be QuickTrip3385 010123 IFT (or USFT).
    • At some point in the model-building process, send an email and receive a response including the project units.
    • Software types behave differently. Some will shift coordinates and not present a warning while others will. Know your software.
    • Final review needs to include the control points. Make sure the coordinates and points make it to the field for verification.

In the Field

    • Know your units and do not change them between data collectors and machines.
    • Calibrate the job with the units being used by everyone. The coordinates of your control points must match the surveyor.
    • The elevation does not change if the coordinates are shifted, no need to worry about that.
    • Upon starting for the day, check in to a known point for verification. This can be a control point or one you set yesterday before stopping for the day for ease of access.

If you are unsure about the new survey measurement standard or 3D modeling for machine control, reach out to TOPS and we’ll be happy to help.

US Survey Feet and International Feet; everything you need to know

US Survey Feet and International Feet; everything you need to know

If you have never had the misfortune to deal with the difference between US and International feet, consider yourself lucky. When the issue presents itself, it can make things difficult to understand. No worries, the curtain will now be pulled back and the mystery solved.

First a bit of history, this will be abbreviated to keep you awake. The United States joined the Treaty of the Meter in 1875. It took the group 5 years to redefine the metric system, which made the length of the yard measurement used in the US at that time different from that used as the standard dictated in the Treaty of the Meter.

In 1960, the US changed the yard to .9144 meters exactly. This shortened the length of the new US Yard by 2 part per million. We will go over what this means in a moment, for now here is the conversion factors.

US Survey Feet vs. International Feet

One internal foot equals 0.999998 US Survey feet. To go from US feet to International feet, multiply US feet by 1.000002000004000008000016000032 (approximately) to get International feet. Yes, that’s five zeros followed by a 2 and a lot more zeros. In other words not a lot. To go from International feet to US feet, multiply International feet by .999998 (exactly).

The take home message above is two parts per million. In other words, if you were working on a 2 million foot long road, (378.79 miles) your error from end to end would be 2 feet. My point is that using either system will not affect your job. If you are using International feet and the job was surveyed in US feet, you will be OK. With exceptions, read on.

I will use a simple but powerful example to explain the issue. Our imaginary job has a corner point of N 2,000,000 and E 2,000,000. The surveyor localized in International and I build the job in US feet. The corner point I mentioned is the same coordinate value for both of us. It does not matter what coordinate system I use to localize the site with my rover. I am going to occupy the points staked by the surveyor. This includes our subject 2 million by 2 million coordinate. The job will fit and perform fine. I refer you back to the fact the difference in these two systems is 2 parts per million.

With the above information known to you, how can someone ever have a problem with the different systems? In a word; conversion. Let’s use the coordinates above. The plan notes read the job was built in International feet, we decide to make it US feet. Applying the conversion we get the following;

2,000,000 x .999998 = 1,999,996.00 In this example we can easily see the 2 parts per million. Our job is now 4 feet off to the north as well as the east. All you need to do is move the job and verify the rotation of the job from our 2 million, 2 million point. We always check at least 3 points. Here is the hard part to understand. You effectively shrunk the job, why won’t this affect the actual size of the site? I refer back to the 2 parts per million factor.

Let’s say you are on a big site, a big truck merchandise transfer facility off an Interstate highway. The job is a mile across. How will the job size be affected by the conversion? Here is the math.

1 mile, (5,280 feet) x .999998 = 5,279.98944 That translates to a hundredth of a foot over a mile. This difference is impossible to see on paper, or in the field.

What do you need to do? Here are the guidelines for success in international feet to us survey feet conversion;

  • Try to use the native units the job was designed in.
  • Never convert units, just know what you have and what coordinates the site was localized in.
  • Make a note of at least 3 points that you can find on the CAD file and the site. Refer to these and verify they are in line with each other.
  • When in doubt, ask somebody to verify. A question now is cheaper than a screwed up job.
Issues with US Survey and International Feet

Issues with US Survey and International Feet

I wrote an article a while back about the difference between US Survey and International Feet. You can read it here.

I have received many questions regarding what can happen to a job and how to tell what units you are in. To address this, I will first go through the correct way to do things; then go through a routine that will ignore the units and get you working.

Here is how you should go about localizing a project.

  • Contact the surveyor and verify the unit type being used on the project. US Survey feet or International feet.
  • States differ. The surveyor can even choose to use something different than the state recognizes. Make sure you get on the surveyors page.

You will need to start from the top down in order to make sure the job is in the correct units, but read on; it’s a mine field out there.

In the Office

  • Always select, write down and refer to at least 3 points that can be located on the paper plans, the CAD files and the job in the dirt. Share these with the surveyor or ask them for three points they use for “check in”. Check in is a group of points that ends up getting memorized because you check into them several times a day, especially first thing in the morning.
  • Verify the job in in the correct units; US Survey or Int’l. Draw these Check In points on the screen in the program you are using to build the data and verify that they are in the right spot. I previously mentioned the points need to be related to lines on the CAD, plans and ground. With that being the case, you will now see the points right where they belong.
  • The image shows a cluster of points. Make sure there are points scattered around the entire job. This serves two purposes; if you check into the extents of the job instead of one corner, you’re assured of the orientation. Secondly, you won’t have to walk/drive so far if you spread out the information.
  • At this point you have a job set to the correct units and the check in points are where they are supposed to be. Export the data from your program in the correct units and bring it into the transfer software. This refers to the intermediate software that converts CAD data to a format readable to the field equipment.
  • Many software vendors are eliminating the step of the additional software saving you one more chance for things to get fouled up.
  • The data can now leave the office; it is in the correct units and properly oriented.

In the Field

  • Localize with the correct units and verify residuals. With a good localization, you can now confidently install the job files.
  • Upon loading the data, take the rover and head to at least 2 of the check in points at opposite ends of the job to verify you have everything set right.
  • You have just verified that your job is in the correct units and oriented correctly. You may proceed to work on the job after loading and verifying each machine.
  • You are only as accurate as your last occupation of one of the Check In points. We will now discuss why this is so.

What causes problems

Technology and construction are constantly improving, as we learn more we take that knowledge and put it to use in the field. As an example; a grade checker reads my article linked above and decides the job needs to be in US Survey feet. Drilling through the menus he changed the setting and went back to work. Luckily things looked funny and he had the good sense to figure out the error of his ways before ruining previous work. Crisis avoided and lesson learned.

I am all for doing things by the book as described in this article. I also spent many years in the field and understand the need for production. Here is what you need to know in order to make things work regardless of the units used.

The most important thing to remember is the difference in US and International feet is 2 parts per million. With a job localized to state plane coordinates of a N1,000,000 E1,000,000 in US feet and the site loaded in the incorrect units, it will be off by about 2 feet.

If this happens, the job can be moved to correctly occupy the Check In points and work proceed; here is the reason:

Even though the jobs units have been changed, a site or road is not big enough for the error to be noticed. As an example, if we were on a road that was a million feet (189 miles) and we moved the job to set on the start station, the road would be 2 feet off at the end. I know this is never going to happen, but it illustrates the error encountered when the job is correctly placed on your localization and Check In points. Any single site, no matter how large will remain unaffected. Larger jobs always have multiple base station locations and localizations which zero out the error on every new setup.

Tips for Success

  • Start from the top down with data in the correct units. The same units the surveyor is using.
  • Have shared Check In Points used by you and the surveyor. You are only as good as your last Check In, do it first thing in the morning and throughout the day.
  • Immediately stop when something does not look right.
  • Even though you can muscle the job into working by moving it. It is always best to start correctly. Your results will be better and you will sleep easier.
X